


Not finding answers to your questions? Click here to contact us!
Frequently asked questions about using GarGraves Products.
Can I use GarGraves track with track made by other manufacturers?
What tools do I need to cut GarGraves track rail?
How do I attach GarGraves track to my table top?
Why does my engine stop when traveling through my GarGraves switch?
Can I use GarGraves track outdoors?
How do I create isolated rails for non-derailing?
How do I use GarGraves Remote Control O-42 switches end to end in a yard?
What are those little bumps on the sides of the GarGraves pin for?
How do I close the rail gap left by the protrusions on the pins?
Can I use GarGraves track with track made by other manufacturers?
Yes. GarGraves track can be mated with other track systems. Here's how it's done.
Lionel
Fast Track to GarGraves: Use Lionel item no. 6-12040 and GarGraves O Gauge Mating pins item # 801
Lionel O Gauge to GarGraves: Use GarGraves O gauge Mating pin # 801
Lionel O-27 to GarGraves: Use GarGraves O-27 Mating pin #802
Lionel "Super O" to GarGraves: Use GarGraves #803 mating pin for the outside rails. To join the center rail either use the Super O power blade connector (Lionel # 31-7) by squeezing together and inserting into the web of the center rail of the GarGraves track or make a separate power feed to the center rails.
MTH
RealTrax to GarGraves: Use MTH item #40-1011 and GarGraves O-27 gauge Mating pins #802
Atlas
Atlas to GarGraves: Use Atlas item # 6096 to mate directly to GarGraves track
American Flyer
Flyer track can be mated directly to GarGraves Track using GarGraves Track pins #803
**Roadbed may be needed to compensate for differences in overall track height.
What tools do I need to cut GarGraves Track rail?
We recommend using a rotary tool such as one made by Dremel and using a "Gyro" cut-off wheel
You may also use a razor saw such as a "Zona Saw". When using a saw it is helpful to make a small holding block from a scrap of wood by cutting three slots in it to fit over the rails to hold them firmly. This block may be used to clamp the section down to the edge of the work bench.
We do not recommend using a hack saw as the aggressive nature of the blade may tear the metal rather than cut it cleanly.
How do I attach GarGraves Track to my table-top/benchwork?
The simple answer is to pre-drill 1/8" clearance holes in the ties and using our #4 screws fasten the track to the table top.
Variables such as roadbed type, thickness and table top material will be a consideration when choosing the length of the screw.
On GarGraves 37" straights 3 to 4 screws per section spaced over the length of the track are adequete. Screws should be placed on alternating sides of the center rail.
When securing sections of GarGraves track which you have bent into your own curves, the amount of screws needed will vary depending on the length of track and how a tight a curve you bend. Gradual curves require less screws than tight curves. Many people predrill some of the ties with 1/8" clearance holes (again alternating each side of the center rail). After bending the track the track can be attached to the table top through the tie and roadbed.
GarGraves pre-formed curves can be secured by again pre-drilling 1/8" clearance holes in the ties and securing to the table-top/benchwork. The number of screws required will vary depending on the length of the particular section of curved track.
Important: Not drilling a clearance hole in the tie will cause the tie to split.
Only tighten the screws until the head is in contact with the tie.
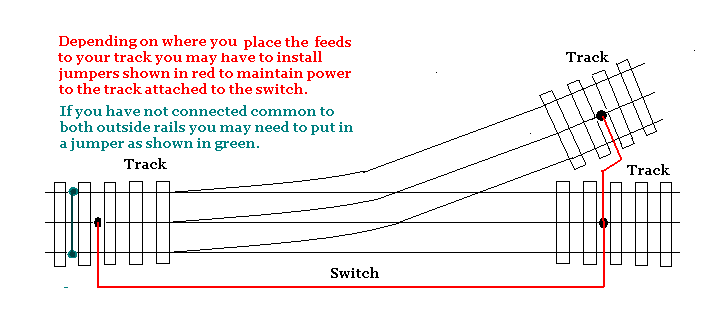
Why does my engine stop when traveling through my GarGraves switch?
GarGraves switches are not wired through for continuous power through the center rail. The user will need to provide track power to each end of the switch (three places). This can be done by adding jumper wires to the center rails of the track leading into the switch. A drawing of this is available on the diagrams and instructions page of the website. In addition both outside rails should be connected to the common on your power supply.
Can I use GarGraves track outdoors?
GarGraves manufactures O Gauge track with plastic ties and stainless steel rails. The ties on the track are available in either black or gray.
GarGraves switches are made with a plastic base. Using stainless steel rails make these perfect for outdoor use. Z-Stuff switch machines are not made for outdoor use. We therefore recommend a manually thrown switch.
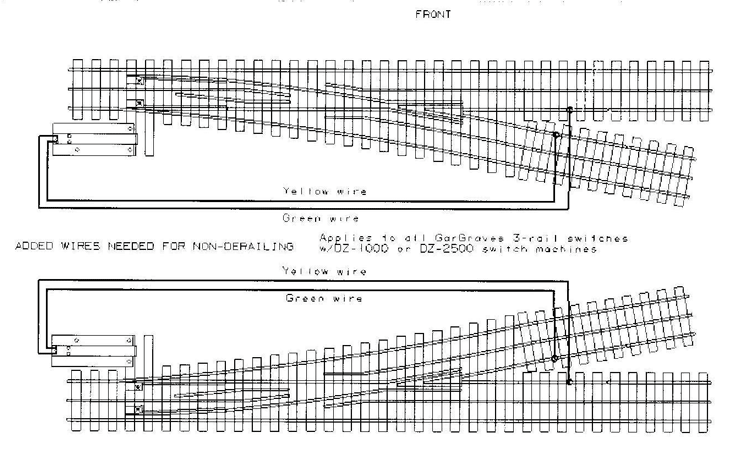
How do I create isolated rails for non-derailing?
On the track leading to the frog end of the switch (the end of the switch with the diverging track (V shape end)) make a cut on an outside track rail 4 or 5 inches from the end of the switch. This creates an isolated rail. See this drawing for which rail to cut. Be sure to remove any metal particles from around the cut to avoid a possible connection between the rails. Install a jumper on each isolated rail long enough to connect them to the switch machine terminals per wiring diagram.
How do I use GarGraves Remote Control O-42 switches end to end in a yard?
The GarGraves remote control O-42 switch is equipped with the DZ-1000 switch machine. It is mounted on the extended tie on the turnout side of the switch. The short footprint of the switch and the length of the switch machine prevent the switches from being mounted end-to-end unless you do one of the following:
1)Insert a short piece of track between the switches.
or
2)Move the machine to the opposite side of the switch. GarGraves now has a separate tie extension piece that you can mount to the straight side of the switch and move the machine over to that side. It is item # Tie-Ext. Pictures of how it's used can be viewed on the home page
What are the little bumps on the sides of the GarGraves pin for?
The purpose of these protrusions is to prevent the pin from being pushed into the rail beyond half way when joining two sections of track together. If you don't like the small gap it leaves check out the next FAQ.
How do I close the rail gap left by the protrusions on the pins?
After joining two sections of track together there may be a small gap either from the protusions on the pin or if you bent a curve it could be uneven rail movement. To close the gap, take a small block of material and place it against the rails on the opposite end of the track section where the gap is located. Gently tap the block against the rails and close the gap between the rails. This is done more easily if the track sections have already been fastened down to the benchwork. This can only be done on GarGraves flexible line of track. The rail on the sectional curves and straights are fixed in the ties.
Prices subject to change without notice
Copyright 2008-2023
GarGraves Trackage Corporation
